Denise Tallon Havlan’s award winning art quilts have been described with words like innovative, imagination , excellence in workmanship.
In her creative approach she has indeed marched to the beat of her own drummer and the results are stunning. The name she has given to one of her out standing quilts, ” Unbridled Passion” is a good description of her quilts as a whole.
Her approach to her work is passionate. It is alive with color. The design and composition are bold & strong. You are going to find it difficult to pull your attention away. You will not walk away and forget one of her works, they are memorable and unique
Here’s a peek into the woman behind those amazing images, the faces that look back at you and connect with you authentically.
1. What inspires me to create and how do I keep motivated –
My visual world is composed of images. I love to watch people doing the most mundane, everyday things like sitting and just waiting. People standing in a group conversing, animals at the zoo or in my own back yard. The human and animal form interests me the most and always inspire my thought process when imagining a new work. Happiness, sorrow, surprise….emotional reaction to something gives me an instantaneous vision that may stay with me for sometime and eventually come out in one of my drawings.
2. Where do I get my ideas and what about my creative process –
My ideas come from the subject matter that interest me at the moment. It may be a movie or book that I am reading at the time or just a thought or image that comes into my head or see in real time. I will begin with sketches that eventually develop into finished drawings. I enlarge this scene to the desired finished size I want the work to be. I create all the individual images within the piece using various surface design techniques like…painting, embroidery, hand and machine applique and sometimes I will even embellish my work with selected items. My quilting is machine free motion. I will occasionally use a decorative quilting stitch but most times rely on my imagery to carry the work and use simple stippling and straight stitching quilting patterns.
3. Who/what has had the most influence on my work? –
In the beginning of my quilting career I was most influenced by art quilters like Penny Sisto, Velda Newman and Annemieke Mein. I believe it was not only their subject matter that pulled me in but the way they worked with their tools to take the textile/quilt medium to a different level.
4. What do I do for fun –
I hang with my two grand children
.
5. Something funny that has happened to me?
– I was sitting under a shaded pavilion at the local park reading while my grandson played with other children. There was a collection of young mothers doing the same when my “darling” 5 year old grandson walked up to me with a little friend and said “this is my grandma…..she’s 60”! Oh, well….
6. Handling the business side of my career –
I stay away from it as much as possible. Working on the business means not working on the “work”. Much to my chagrin, I spend a minimal amount of time on the business side. I maintain a website, network with a small group of professional quilters, belong to 5 professional associations and teach and lecture in the Illinois, Wisconsin and Indiana area. I am a studio artist and I like it in my studio!
7. Advise for an inspiring fiber artist just starting –
Take all the workshops/classes you can by the quilt artists whose work you like the most. Once you get a handle on how to work with the medium (5 to 7 years) start doing your own thing. Use all the techniques and ideas in a new and original way. Always think outside the box. If your work looks like someone else’s you are not there yet.
8. How do I describe my style –
Boy! would I love to say that my work is my own style BUT……It would probably be described as “expressionistic”. I am not trying to create reality but more of an idea or expression of an emotion or feeling in the work. The originality comes from the medium I have chosen to work in. Fabric is allowing me to achieve a certain aesthetic quality with color and texture that may be new and different.
9. Describe myself in 5 words
– Willing to suffer for art.
10. What have been the biggest obstacles in achieving success –
MYSELF….By that I mean that I am not an “out there” type of personality. I should probably be more involved in the “quilting public eye”. I always say that quilter’s around the world know my work but do not know me.
11. Quilt artists I specifically admire –
To name a few…… I have great admiration for Caryl Fallert, Libby Lehman and Diane Gaudynski. They have achieved the pinnacle of success and share their talents and knowledge with any quilter willing to learn.
12. How did my interest begin –
My interest began with an impromptu 1989 visit to a quilt shop and wanting to buy what turned out to be class samples. The owner of the shop told me if I wanted one of those samples I would have to make it myself. I laughed and told her I did not know the first thing about sewing! She then said “I will teach you”. That was my intro into quilting and I have not stopped since. By the way….Those samples were Amish quilts which I still have a love affair with today
.
13. Has the recognition or acclaim effected me as an artist –
I suppose in some way it must. I have positive confidence that my work affects the viewer the way I intend it to. When work gets noticed that is a rewarding experience for the creator. What I must strive to do is to not let it affect the way I approach new work. In other words “I do not set out to make an award winning quilt”. Once I do that, failure is ensured. I approach each new piece with a new vision that must be created spontaneously as the work progresses. I want serendipity in the creative process to allow for that wonderful original vision to happen. This is hard to achieve in such a laborious medium as fabric. I do not concern myself with competition “rules & regulations” except for the obvious – size and 3 layers.
14. Proudest accomplishments to date –
The many friends I have made in the quilting world!
15. What keeps me inspired and motivated –
I stay physically healthy, close to my family and friends and always perceive myself as a “beginner”! That way there is always something new to learn and only one way to go…….UP!
Here are some photo’s of Denise’s award winning quilt Snapshot: Shannon’s Bantam.
She has included some nice close ups of details . I’m amazed by the thread painting, just incredible! For example look at the thread painting done on Shannon’s hair. The attention to detail is again, amazing, for example, notice the subtle pattern on her denim overalls. I’m running out of superlatives, so I’ll just say this is an outstanding work [a massive understatement]! Thanks Denise for sharing these close ups with us .
Snapshot: Shannons Bantam
detailed pic of Denises work. Beautiful
Be sure to check out her web site for more of her amazing quilts.
If you recall a few posts back I had a huge mess in my kitchen hand painting some silk fabric. Here in Oregon it rains a lot so I have limited choices for a paint studio. My little make shift studio tent out side is no longer workable because the downpours have commenced. So to my husband’s dismay the kitchen is my new painting area. You could see the fabric I was painting in that post.
I had a plan for that fabric and now that it’s finished it was worth the bother. I did a little trapunto, I mentioned I hand painted the silk fabric, then on separate pieces of silk painted some bird,s added fusible and appliquéd them down and finished the raw edges off.Used trapunto on a few areas and thread painted in the details and texture on the branches, leaves and birds. Viola! It’s finished. Here’s a few picture s and there’s more in the gallery.
This is the mess we have created thus far, the small rotary cutters are really useful tools here's where we're at, a lot of little puzzle pieces have are fused to the background.
Here’s where we are so far; the backing . batting and top background are sandwiched together. I use a spray adhesive 505 Spray And Fix to sandwich everything together. The parts of the puzzle pieces are in the process of being fused to the quilt sandwich. As you can see there is subtle color variations with the individual parts of the flowers. You will need to finish fusing down your entire composition.
It is starting to come together.
keep adding more to the composition until you are happy with the result.
Your next step once you have fused down all the pieces is to zig zag around the edges of each individual piece in the matching thread color.. You want the stitches set shorter and tightly spaced together. Go slowly, stop when you need to turn fabric and so on. Be sure to pull up your bobbin thread to the top when you start out at the beginning of each thread color change.
ZigZag around the edges and add additional details with straight stitch as shown in leaf veiningclose up of poppy with edges zig sagged.
I used some free motion thread painting to add details and highlights.
ready for quilting
I’ll finish it and show you the finished quilt next time. Happy Quilting!
Like most people summer is a busy time and I’m no exception. But for me it is quilt related.
I have had some really interesting custom orders that I’ve been busy with. I especially love making something specifically for someone. It is an opportunity to get to know the person who commissioned the piece I like having that interaction, it makes the work so personal. I’ve honestly met some of the nicest people through custom orders from my Etsy shop. We have a common interest from the git go, these are people who appreciate art, my art in particular! How cool is that?
Anywho.. I feel especially motivated to make something they will really love. They have paid me the greatest compliment, they like my work and want me to make something just for them! That’s so enjoyable.
Back to the busy summer…I sent several of my quilts out for the Second Skin Textile Art Exhibit [see interesting people and events for more info on that event] and looking at my Etsy shop, well it looks empty. I better start jamming out them art quilts!!! I work literally day and night, compulsively so, couldn’t stop if I want to! But I better pick up the pace!
Then in Oct there is a Big and I do mean BIG art show in Vegas-Art In The Park . One hundred thousand people come by the bus load for this event! I’m so hyped I can’t even stand it,. Again I need to take a lot of art there for the show. More art quilts, more art quilts!! I love working, but there is only so much one person can accomplish. Where are my super powers when I need them I ask?
So here’s the start of several new quilts, more to follow. I’m on a botanical kick, loving the thread painting and hanging on to the last of the flowers as fall approaches. Here’s the wee beginnings…
Bonus: a tutorial on raw edge appliqué
sketches for the quilt. I draw them on the paper of the fusible web-then a pattern is born!peony sketch on the fusible web
Now the sketches are on the top paper of the Lite Steam a Seam fusible web. I can start carefully cutting out, one at a time, e little” puzzle piece” and fuse it to my fabric of choice. Place it on the backing and iron it to tack it down. Then move to the next piece of the “puzzle” and repeat the whole process til I have the entire flower on the quilt backing.
an example of this method, making leavesLeaves cut out, next stick to your fabric then fuse onto background,here’s that leaf stuck to the green fabricpeel off the backingplace your leaf where you want itiron it in place to fuseHere’s several flowers with each little puzzle piece fused downGuess what? This makes a big ole mess!
More to follow on this process…Stay tuned! Lesson #2 on the raw edge appliqué next post.
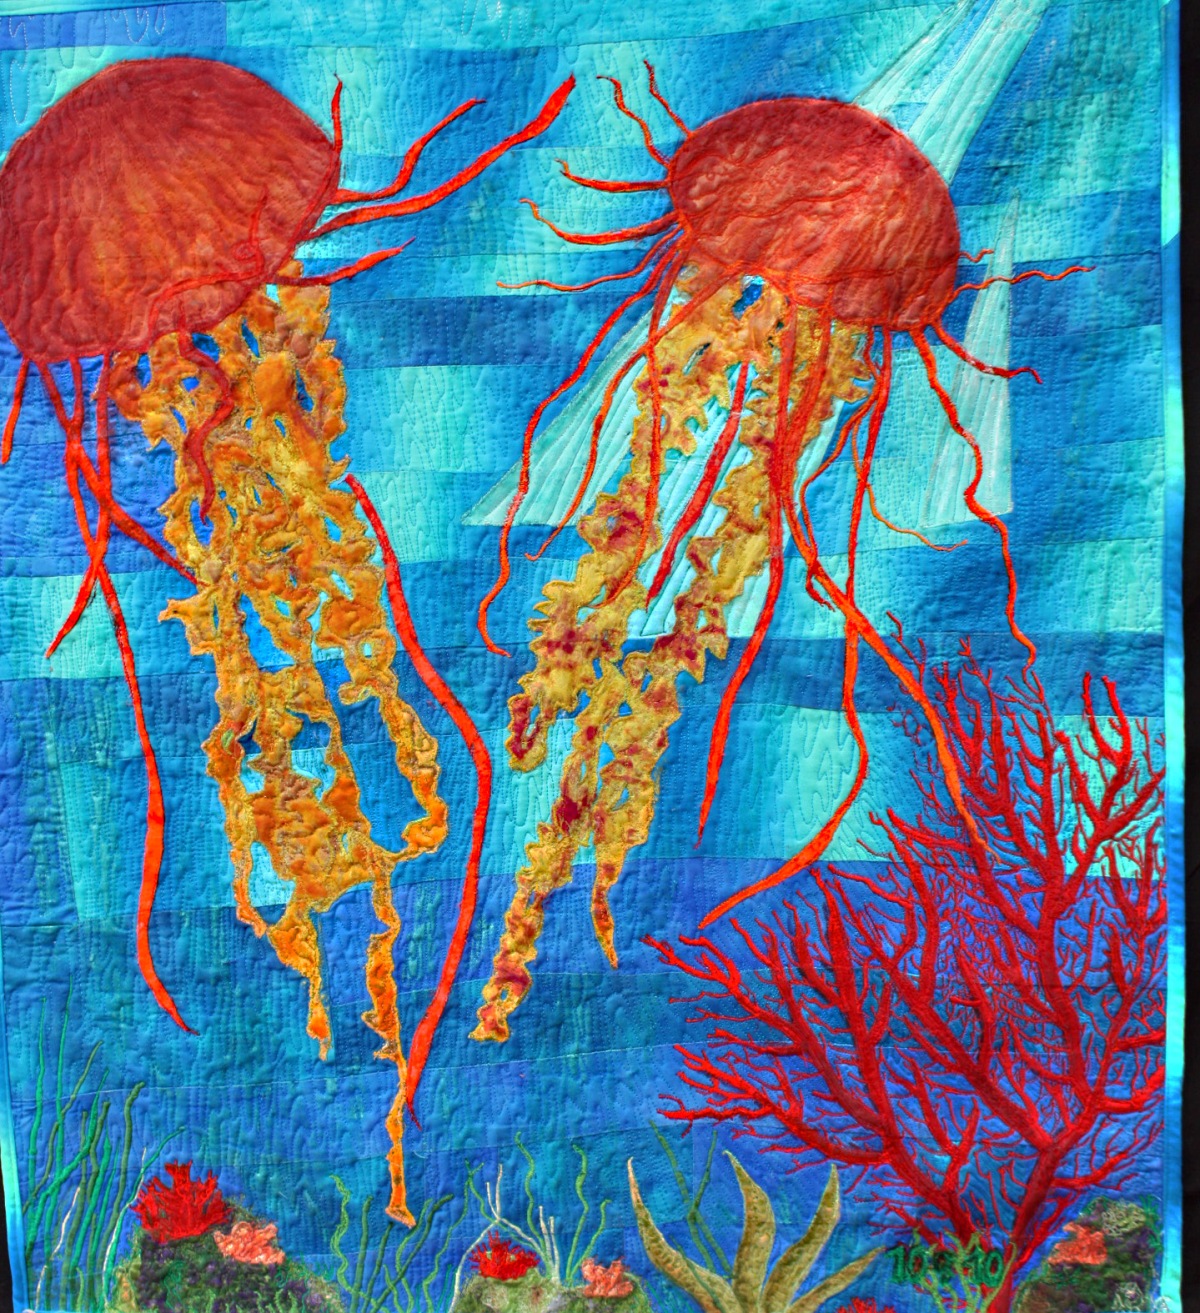
When I got the request for this custom order for 2 jelly fish featured in an art quilt, I would never have thought of doing a wall hanging with this theme. But the more I thought about the request, the more excited I got about the idea.
I did some sketches, after looking at a lot of photos of jelly fish. My biggest obstacle was how do you capture the fluidity? How do you take fabric and try to make it almost translucent looking, and jellys almost look lit from within, how do you do that with fabric?
The back of the advertisment, with my art quilt pictured!
I was asked to submit some of my art quilts in a textile art exhibt; Second Skin Textile Art Exhibit. It is being held in New Hope, Pa at the New Hope Art Gallery Sept 11 – Oct 9th.
Here’s a copy of the flyer, with my art quilt pictured on the back!
As I promised, I’m updating my progress on the jelly fish art quilt I’m making for a custom order on my etsy site; AsianArtAndQuilts@etsy.com { take a peak}.
fusing done, thread painting started
Some detail done a lot more to do. This is the fun part.
the fabric is rock candy blank fabrics I think, gold and copper metallic highlights.
Today this is what I’ve done, real progress on the thread painting, this is the fun stuff.
more fill in details
Sad blurry little picture, and me claiming to be a somewhat good pphotographer, my ego has no bounds apparently.
Here’s another:
I like the staghorm coral, but siome of the limbs could be bigger, waht do you think? Tell me your thoughts.
The jelly I may have just over done it with the details, do you think?
Less is more, I may be ripping out threads if this doesn’t start growing on me.
less detail on this one, better yes?
I have one more pic, a darling humming bird outside my kitchen window.


